

INSTALLATION

Step 1
We do a thorough site review. We look at things like roof, roof pitch, roof valleys, trees, vegetation debris, deck layout, and deck construction. These factors influence some of the decisions we make on how to structure your Underdeck.
Step 2
Flashing is installed around the perimeter of the entire deck. Gutter is set in place and proper caulking is applied around flashing.

Step 3
Perimeter G channel trim is installed. This is a beautiful one of a kind trim that receives the panels in a unique fashion.

Step 4
Carrier brackets are next installed. These brackets attach to decking joists and provide the strength and support to all components. These brackets work with the panels to connect them and create the overlap needed to hold water.

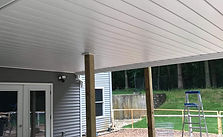
Step 5
Panel installation is the final step. We slide the panels into the G channels then snap them into the carrier brackets. There are no gaps and all panels overlap to create an elegant functional ceiling.